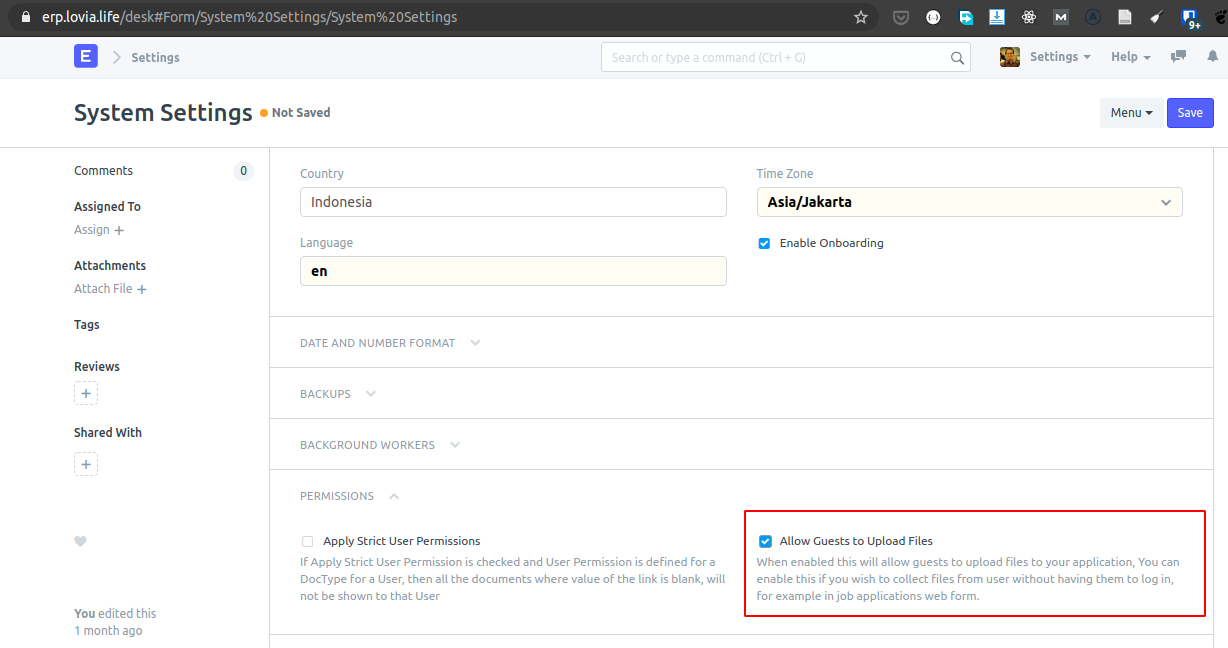
Allow Guests to Upload Files
By default, Allow Guests to Upload Files is disabled, so you’ll get error: attach.js:106 Uncaught TypeError: Cannot read property ‘file_url’ of null
Solution: System Settings > Permissions > Allow Guests to Upload Files.
URL Variables/Query Parameters
By adding the field name in web form URL, you can pre-fill the field when opening the form, e.g. http://localhost:8000/talents/signup?new=1<strong>&role_python_developer=1</strong>.
Customization with JavaScript
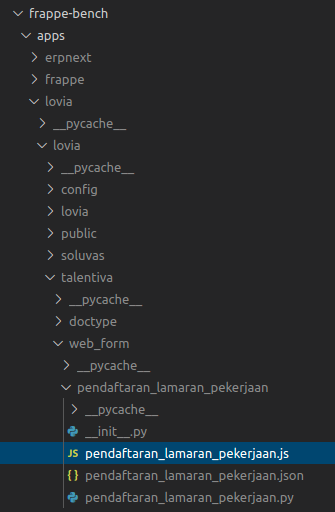
When you create the web form, Frappe will create a folder hierarchy based on the name of the web form, and the name is sluggified from web form title, e.g. frappe-bench/apps/lovia/lovia/talentiva/web_form/<strong>pendaftaran_lamaran_pekerjaan</strong>/pendaftaran_lamaran_pekerjaan.js
The .js file can use Jinja template syntax as well, so you can have “dynamic JavaScript” code. In development, you don’t need to reload erpnext-nginx, you can directly refresh the web page after editing the .js template.
Inside the JS file, you call frappe.ready() to hook to frappe.ready_events. All hook callbacks there which will be called in order by apps/frappe/frappe/website/js/website.js‘s trigger_ready(). The initialization order in web form JavaScript is:
- website.js : $(document).ready. At this point nothing is shown, it then triggers $(document) page-change event.
- website.js $(document).on(‘page-change’) triggered. It will trigger $(document) apply_permissions. At this point nothing is shown. Then it will trigger_ready and call the frappe.ready() callbacks. At one of the callbacks, header and footer are rendered. webform_script.js’s also hook into frappe.read() but uses AJAX, so rendering is asynchronous. After trigger_ready() completed, web form is not yet shown. The web form will later be rendered at: #
page-pendaftaran-lamaran-pekerjaan > div > main > div.page_content > div > div > div.web-form-wrapper. apps/frappe/frappe/public/js/frappe/web_form/webform_script.jswill be called, which will render the web form by show_form() -> web_form.make(); This seems to be called asynchronously during the previous step, due to AJAX usage using frappe.call() defined in website.js.web_form.jstriggersfrappe.web_form.events.trigger('after_load').
web_form.js provides two frappe JavaScript objects that you can use:
- frappe.ui (includes frappe.ui.form)
- frappe.web_form
Customize Web Form Business Logic with Python
In .py file, you can call e.g. frappe.get_doc() or <a href="https://frappeframework.com/docs/user/en/api/database#frappedbget_list" class="rank-math-link">frappe.db.get_list()</a> and save into context.<em>something</em>, which will be usable in JavaScript template. Example:
from __future__ import unicode_literals

import frappe

def get_context(context):
	# do your magic here
	context.country_subdivisions = frappe.db.get_list('Country Subdivision', filters={'is_group': False},
		fields=['name', 'title'], order_by='title ASC')
	print(context.country_subdivisions)
	pass
Displaying Custom Information
You can add a “phantom field” in the Web Form, set the type as HTML, then put an empty div e.g.
<div class="event-details"></div>that you can then manipulate using JavaScript.
Modifying/Tweaking ERPNext Web Form DOM via JavaScript
Inside frappe.ready(), add callback using frappe.web_form.events.on('after_load', your_callback_here). Example:
function reloadCurrentStateOptions() {
	const countrySubdivisions = {{ country_subdivisions|tojson|safe }};
	// console.log('countrySubdivisions', countrySubdivisions);
	const currentStateSelect = $('select[data-fieldname="current_state"]');
	// console.log(currentStateSelect);
	currentStateSelect.html('<option></option>');
	for (const countrySubdivision of countrySubdivisions) {
		// console.log({value: countrySubdivision.name, text: countrySubdivision.title});
		currentStateSelect.append($('<option>', {value: countrySubdivision.name, text: countrySubdivision.title}));
	}
	// currentStateSelect.append($('<option>', {value: 'halo', text: 'yes'}));
	// console.log("");
}

frappe.ready(function() {
	// bind events here
	frappe.web_form.events.on('after_load', reloadCurrentStateOptions);
});
Add CSS
To add custom CSS, add another file with same basename but with .css extension, e.g. pendaftaran_lamaran_pekerjaan.css. Frappe will automatically load the CSS when showing the web form.
Known Issues
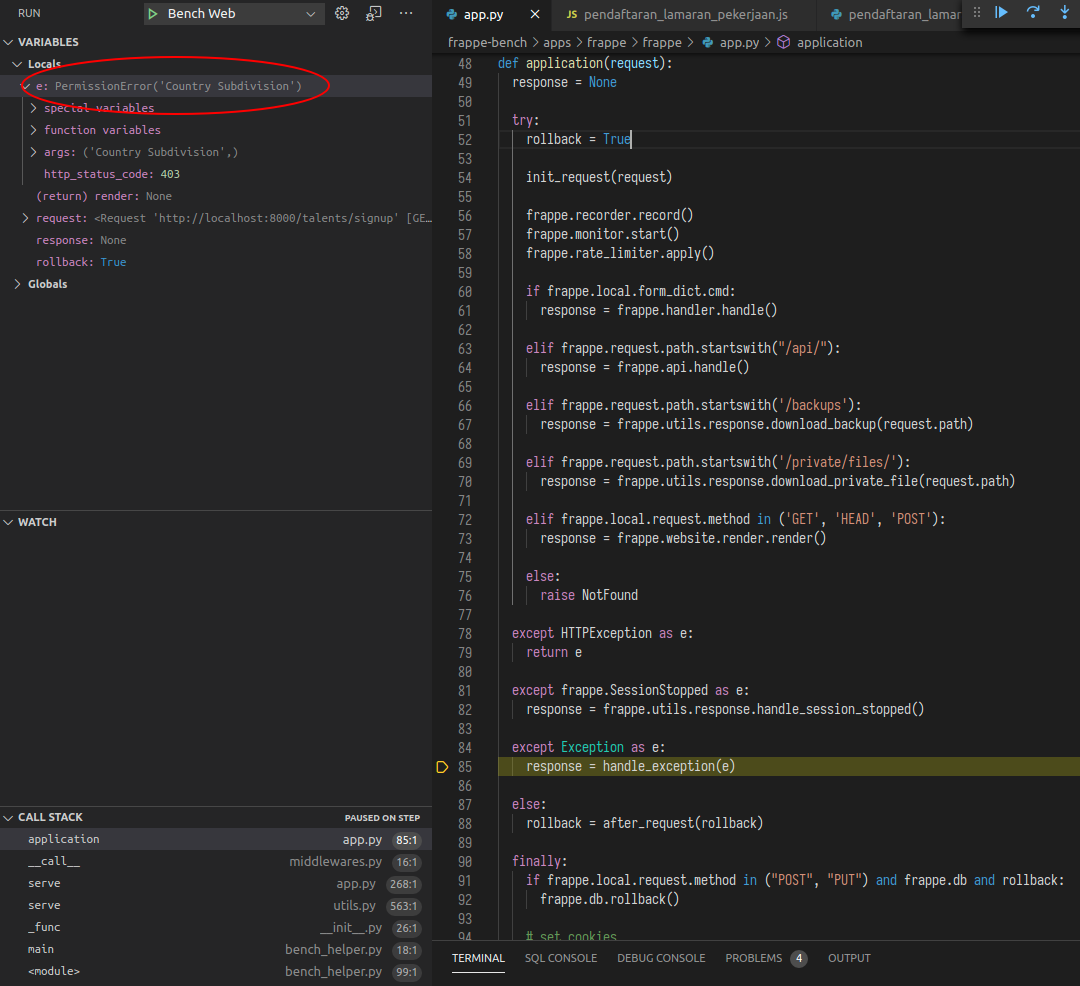
In case you get “Not Permitted” error, you can debug and set breakpoint in app.py : application(request) : exception Exception as e. Now you find out what is the PermissionError. The problem is app.py’s handle_exception(e) doesn’t log anything, this likely should be improved.
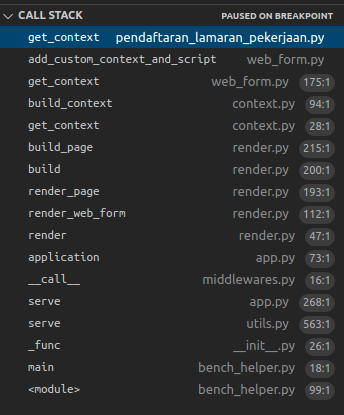
Debugging / Call Stack