How to create a Docker image from an existing Strapi app and Run it locally
In Strapi website, when installing Strapi using Docker, the available guide only tells you how to create a brand new Strapi app. On the other hand, they do not give a step-by-step guide how to build your Strapi app image from an existing project 😔
In this article, we are going to learn how to create a Docker image from your existing Strapi app ! Here is the Github Repository that I use in creating this article, you may want to check it out while reading this. Without further do, let’s get started 🚀
Github Repository : https://github.com/kevinadhiguna/strapi-dockerize
Step 1 : Create a Dockerfile
A dockerfile must always start by importing the base image. We use the keyword ‘FROM’ to do that. In our example, we want to import the Strapi image. So we write strapi/base for the image name. :14 is a tag that means we use NodeJS v14 (The latest LTS version).
FROM strapi/base:14
# Set Environment to Production Environment (Optional to include in Dockerfile)
ENV NODE_ENV production
# Set up working directory that will be used to copy files/directories below :
WORKDIR /app
# Copy package.json to root directory inside Docker container of Strapi app
COPY package.json .
# Copy yarn.lock to root directory inside Docker container of Strapi app
COPY yarn.lock .
# Install dependencies, but not generate a yarn.lock lockfile and fail if an update is needed.
RUN yarn install –frozen-lockfile
# == Copy required files ==
# In order to launch our Strapi app, we must import it into our image.
# We use the keyword ‘COPY’ to do that.
# The first parameter is the name of the file on the host.
# The second parameter is the path where to put the file on the image.
# ‘.’ or ‘/’ means the file will be put in the image root folder.
COPY favicon.ico .
COPY public/robots.txt public/
COPY extensions/ extensions/
# COPY exports/ exports/
COPY api/ api/
COPY config/ config/
# Generate a folder called ‘dist’.
# A ‘dist’ folder stands for distributable and refers to a directory where files will be stored that can be directly used by others without the need to compile or minify the source code that is being reused.
RUN yarn build
# Run on port 1337
EXPOSE 1337
# We need to define the command to launch when we are going to run the image.
# We use the keyword ‘CMD’ to do that.
# The following command will execute “yarn start”.
CMD [“yarn”, “start”]
Step 2 : Create a .dockerignore file
A .dockerignore file is almost the same with a .gitignore file which allows you to specify a pattern for files and folders that should be ignored by the Docker client when generating an image. Here is what .dockerignore file contains :
.cache
public/uploads
.env
Step 3 : Build a Docker image
To build a Docker image, we run docker build script with -t that allows us to name the image we will build. I will name it strapi-docker-myapp.
Step 4 : Create a docker-compose.yml file
Now it’s time to run our app using the Docker image. So, we are going to create a docker-compose.yml file :
version: ‘3’
services:
strapi:
build: .
# == MongoDB Atlas configuration ==
environment:
NODE_ENV: YOUR_APP_ENVIRONMENT #(production, staging, development, etc.)
DATABASE_CLIENT: mongo
DATABASE_HOST: DB_HOST #(e.g. : cluster3.abc65.mongodb.net if you are using MongoDB Atlas)
# — NOTE —
# If you have a MongoDB connection string like ‘mongodb://srv…’, it means DATABASE_SRV is ‘true’.
DATABASE_SRV: DB_SRV #(‘true’ or ‘false’, please note that it MUST be string or null)
DATABASE_PORT: DB_PORT #(e.g. : 27017)
DATABASE_NAME: DB_NAME #(e.g. : myStrapiApp)
DATABASE_USERNAME: DB_USERNAME #(e.g. : admin)
DATABASE_PASSWORD: DB_PASSWD
# — NOTE —
# When using MongoDB Atlas, DATABASE_SSL must be set to ‘true’. Otherwise (local MongoDB) set it to ‘false’.
DATABASE_SSL: ‘true’ #(‘true’ or ‘false’, please note that it MUST be string or null)
# AUTHENTICATION_DATABASE: admin
CORS_ORIGIN: ALLOWED_CORS_ORIGIN #(e.g. : http://192.168.1.5:8000,http://192.168.1.5:3000,http://192.168.1.16:1337)
ADMIN_JWT_SECRET: YOUR_ADMIN_JWT_SECRET #(e.g. : ErhxCk10YqNCImwodl5Ml/Maqnw46oTyLjr+9Na4bjmJSLVWnCS90BJRAAkLsspj98caylAJgikBO9ZS0jEiOQ==)
ports:
– ‘HOST_PORT:CONTAINER_PORT’ #(Specify host port and container port, format => host port:container port. e.g. : ‘1337:1337’)
# — NOTE —
# ‘HOST_PORT’ is the port that will be exposable to the public.
# ‘CONTAINER_PORT’ is the internal port in which the app will be running on.
To run your Strapi app locally using docker-compose, please run :
docker-compose up --build
--build means Docker will build the image of your app before running it.
If you have ran it before and want to run again without making changes to your app, you can run :
docker-compose up
If you successfully ran it, you will see Strapi log like this :
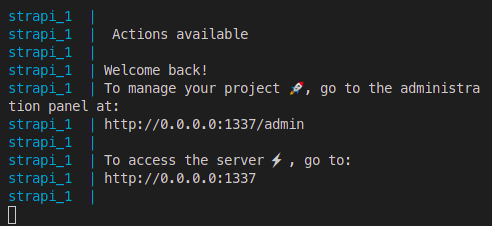
Congrats ! Now it’s time to open the URL in your terminal and access the Strapi admin panel.
If you would like to learn more, here is the Git repository of this article :
https://github.com/kevinadhiguna/strapi-dockerize
Reference : FreecodeCamp
Connect with me :

